How to Configure API Keys in OpenClaw: A Complete Guide 2026
OpenClaw is an open-source AI agent platform that lets you connect to virtually any popular language model out there – from GPT, Claude, and Gemini to locally-run models like Ollama.
But before your AI agent can actually get to work, there’s one important step you can’t skip: configuring your API keys. Think of it as installing the brain into your OpenClaw setup.
In this guide, we’ll walk through the entire API key setup process from start to finish: where to get your keys, where to enter them, how to run multiple models at once for better performance and lower costs, and how to fix the errors that almost every new OpenClaw user runs into at some point.
What Is an API Key?
An API key is a string of characters used to authenticate your identity when you call a model provider’s service (like OpenAI, Anthropic, Google, etc.). Every time OpenClaw sends a prompt to GPT or Claude, it attaches this key so the provider knows the request is coming from your account and charges accordingly.
Without a key, the agent can’t call any model, which means OpenClaw basically can’t do anything. That’s why configuring your API key is always the very first step when setting up OpenClaw.
If you’re not sure which model to start with, here’s a quick reference:
| Use case | Recommended model | Cost (Input / Output) updated June 2026 |
|---|---|---|
| Try OpenClaw on a tight budget | Gemini 3.5 Flash | ~$0.15 / ~$0.60 per 1M tokens |
| Automated workflows running 24/7 | Gemini 3.5 Flash, GPT-4.1 Mini | ~$0.15–0.40 / ~$0.60–1.60 per 1M tokens |
| Coding and debugging | Claude Sonnet 4.6 | ~$3 / ~$15 per 1M tokens |
| Research and long documents | Gemini 3.1 Pro | ~$1.25 / ~$10 per 1M tokens |
| High-quality content writing | GPT-5, Claude Sonnet 4.6 | ~$1.25–3 / ~$10–15 per 1M tokens |
| Not ready to pay yet | Ollama (local) | $0 |
| Minimal spend | DeepSeek V3.2 | ~$0.14 / ~$0.28 per 1M tokens |
Good to know: 1 million tokens is roughly equivalent to 700,000–800,000 English words. For most regular users, that works out to around $2–15/month when using Gemini Flash or DeepSeek.
How to Get API Keys for Major Models?
Each provider has its own API key management page, but the process is fairly similar across the board – the main differences are the environment variable names and billing requirements.
Here’s a step-by-step breakdown for each popular provider.
OpenAI (GPT-5, GPT-4.1, GPT-4o)
- Go to platform.openai.com/settings/organization/api-keys
- Log in to your OpenAI account
- Click Create new secret key and give it a recognizable name
- Copy it immediately – the key is only shown once (it starts with
sk-...)
Example: OPENAI_API_KEY=sk-...
Note: OpenAI requires you to add credits before using the API. Go to Billing → Add payment method and top up at least $5 to get started.
Anthropic (Claude Sonnet, Claude Opus)
- Go to console.anthropic.com/settings/keys
- Log in or create an Anthropic account
- Click Create API Key
- Copy your key (it starts with
sk-ant-...)
Example: ANTHROPIC_API_KEY=sk-ant-...
Anthropic also requires prepaid credits. Adding around $10–20 to start is a reasonable amount.
Google (Gemini)
- Go to aistudio.google.com/app/apikey
- Log in with your Google account
- Click Create API Key, then select an existing project or create a new one
- Copy your key (it starts with
AIza...)
GEMINI_API_KEY=AIza...
# or
GOOGLE_API_KEY=AIza...
Gemini has a notably generous free tier compared to other providers, which is why many people default to Gemini Flash when first getting started with OpenClaw. Both GEMINI_API_KEY and GOOGLE_API_KEY are recognized by OpenClaw, but we recommend using GEMINI_API_KEY because it is the clearer option.
DeepSeek
- Go to platform.deepseek.com/api_keys
- Log in and click Create API Key
- Copy your key
Example: DEEPSEEK_API_KEY=...
DeepSeek is currently one of the most affordable models on the market with solid reasoning capabilities. This is a great option if you need to run a high volume of tasks while keeping costs in check.
xAI (Grok)
- Go to console.x.ai
- Navigate to API Keys → Create key
Example: XAI_API_KEY=...
OpenRouter (Access multiple models through a single key)
OpenRouter acts as a unified gateway to hundreds of different AI models. If you’d rather not manage a separate key for every provider, it’s a very convenient option.
- Go to openrouter.ai/keys
- Sign up or log in
- Click Create Key
- Copy your key (it starts with
sk-or-...)
Example: OPENROUTER_API_KEY=sk-or-...
Ollama (No API key required)
Ollama runs locally, completely free, with no key needed. Once installed, it’s ready to use.
You can either download the installer from Ollama website (Windows, macOS, or Linux), or install it via the command line:
# macOS
brew install ollama
# Linux
curl -fsSL https://ollama.com/install.sh | sh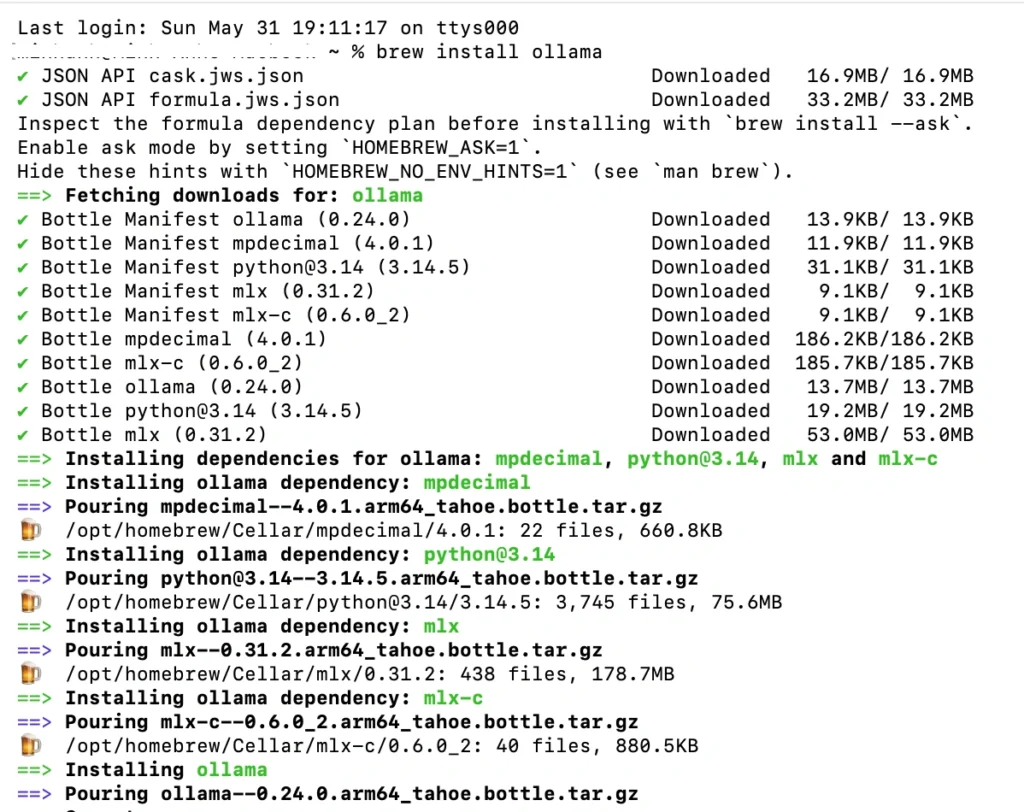
After installation, open Terminal or Command Prompt and run:
ollama run llama3If the model downloads and starts responding, Ollama is up and running.
# Start the server
ollama serve
# Pull models
ollama pull qwen3 # lightweight, good multilingual support
ollama pull llama4 # larger, requires more RAM
Then just tell OpenClaw where to find it:
OLLAMA_HOST=http://localhost:11434That’s all there is to it.
How to Configure API Keys in OpenClaw
Now that you have your keys, it’s time to tell OpenClaw where to find them. The good news is there are four different ways to do this – from a beginner-friendly setup wizard to hands-on file editing for those who like to tinker. Here’s a full breakdown of your options, along with guidance on which one makes the most sense in each situation.
Method 1: Onboarding Wizard (Easiest for beginners)
With this method, you connect your API key directly during OpenClaw’s onboarding flow. Open your terminal and run:
openclaw onboard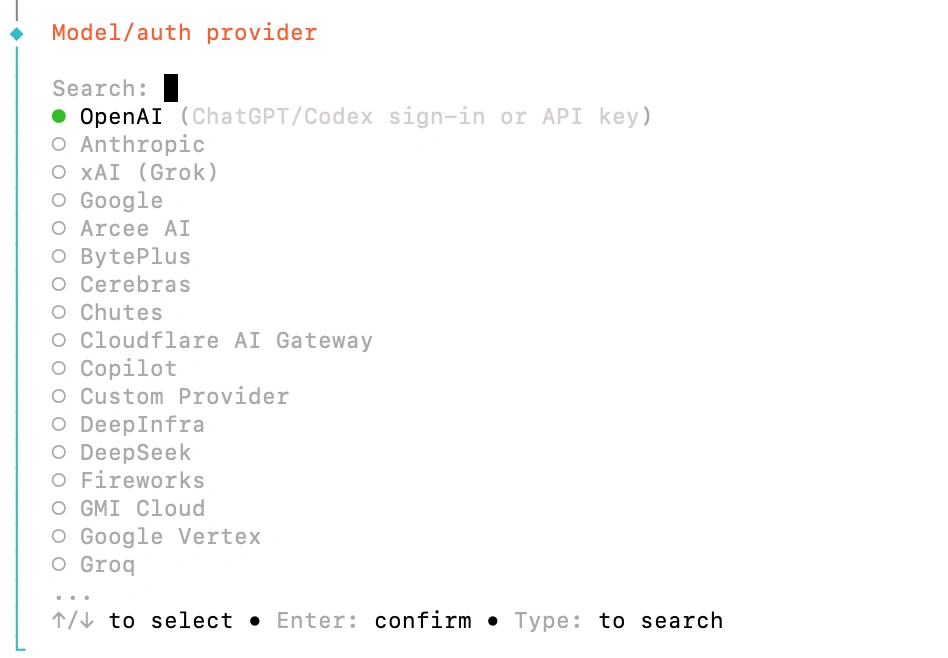
OpenClaw will walk you through selecting a provider and entering your key step by step – no config files to touch, no environment variable names to memorize. If this is your first time setting up OpenClaw, this is the best place to start.
Method 2: Environment Variables
Instead of entering API keys directly in OpenClaw, you can store them as environment variables in your operating system:
export OPENAI_API_KEY="sk-..."
export ANTHROPIC_API_KEY="sk-ant-..."
export GEMINI_API_KEY="AIza..."
Think of these commands as telling your computer: “Hey, here’s where my API keys live.” When OpenClaw starts up, it’ll automatically look for these variables and connect to the corresponding models.
After exporting, run a quick check to confirm everything is working:
openclaw models status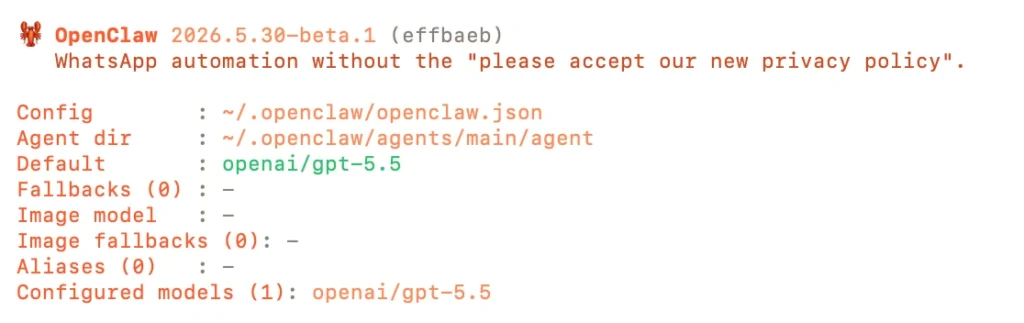
If a model shows a ready status, OpenClaw has successfully read the key.
The downside is that these variables only exist for your current terminal session. Every time you open a new terminal window, you’ll need to run the export commands again. If that feels tedious, use a
.envfile instead to make them persistent.
Method 3: .env File (Recommended for VPS and servers)
Instead of re-exporting your API keys every time you open a terminal, you can store them permanently in a .env file:
OPENAI_API_KEY=sk-...
ANTHROPIC_API_KEY=sk-ant-...
GEMINI_API_KEY=AIza...
OPENROUTER_API_KEY=sk-or-...
This file is typically located at ~/.openclaw/.env.
Think of the .env file as a private notebook that belongs exclusively to OpenClaw. Each time it starts up, OpenClaw opens this notebook, reads the API keys inside, and connects to the corresponding models automatically.
The biggest advantage is that you configure it once and never have to touch it again. Whether you restart your machine, reboot your server, or let OpenClaw run silently in the background for weeks on end, your API keys will always be loaded automatically.
This is also the preferred approach for most VPS and self-hosted setups, since OpenClaw typically runs as a background service rather than inside an open terminal window. If you want to set it and forget it, .env is the way to go.
Method 4: Declare keys directly in openclaw.json
You can also add API keys directly inside OpenClaw’s configuration file:
{
 "env": {
 "OPENAI_API_KEY": "sk-...",
 "ANTHROPIC_API_KEY": "sk-ant-..."
 }
}
Unlike the .env file, your API keys here live inside the main config file that OpenClaw reads at startup. This means everything is consolidated in a single place, which can be handy if you ever need to move OpenClaw to a different machine or quickly deploy it to a server.
That said, this is also the riskiest approach if you’re not careful. Because API keys are stored in plain text, anyone who can read the file can see them. More critically, if you store your source code on GitHub or GitLab, accidentally committing this file will expose your keys publicly. For that reason, most users prefer the
.envfile over storing keys directly inopenclaw.json. Only use this method if you know exactly what you’re doing and you’re confident the file is stored somewhere secure.
How to Check If Your API Key Is Working?
Entering your key doesn’t mean you’re done – you need to confirm that OpenClaw can actually read it and connect to the provider successfully. Fortunately, there’s a single command that handles this in seconds.
After entering your key using any of the methods above, run:
openclaw models statusAny model showing a green status or displaying as available is connected and ready to use. If a model shows an error or appears as unavailable, double-check your key. The most common culprits are missing characters from copying, extra whitespace, or a missing environment variable export.
Also make sure you haven’t accidentally mixed up keys between providers – swapping an Anthropic key into an OpenAI field is an easy mistake when setting up multiple providers at once.
Running Multiple Models Simultaneously in OpenClaw
This is the part most documentation skips over, but it’s actually how experienced users get the most out of OpenClaw: instead of picking one model and sticking with it, you assign different models to different types of tasks.
The reasoning is straightforward: each model has different strengths, and OpenClaw charges based on API calls. Using Claude Sonnet 4.6 for everything could cost 10–20x more than a well-thought-out model assignment. On the flip side, a budget model like Gemini 3.5 Flash running 500 times a day is far more practical than Claude running 50 times a day because you’ve run out of budget to scale.
Most production OpenClaw workflows these days use Gemini Flash as the workhorse for the majority of tasks, with Claude or GPT called in only when genuinely needed for complex content, tricky debugging, or high-stakes decisions.
| Task | Recommended model | Why |
|---|---|---|
| Everyday chat, small tasks | Gemini 3.5 Flash | Cheap, fast, smart enough |
| Continuous automated workflows | Gemini 3.5 Flash / GPT-4.1 Mini | Lowest cost |
| Coding, debugging, code review | Claude Sonnet 4.6 | Best at code |
| Content writing, SEO, copywriting | Claude Sonnet 4.6, GPT-5.5 | Most natural writing style |
| Research, long document analysis | Gemini 3.5 Pro | Long context window |
| High-stakes tasks, zero margin for error | GPT-5.5, Claude Sonnet 4.6 | Highest quality output |
| Maximum cost savings | DeepSeek V3.2 | Extremely affordable |
| Keep data fully on-premise | Ollama + Llama 4 / Qwen3 | Fully local, no cloud |
Step-by-step setup for multiple models
Step 1: Add all your keys to ~/.openclaw/.env:
# Open the .env file for editing
nano ~/.openclaw/.env
Add the following lines (replace with your actual keys):
GEMINI_API_KEY=AIza...
ANTHROPIC_API_KEY=sk-ant-...
OPENAI_API_KEY=sk-...
DEEPSEEK_API_KEY=...
OLLAMA_HOST=http://localhost:11434
Step 2: Verify OpenClaw has picked up all the keys:
openclaw models statusYou’ll see a list of available models from multiple providers. Green means good to go; red or unavailable means check the corresponding key.
Step 3: Specify a model when creating or configuring an agent. For a coding agent using Claude:
openclaw agent create --model claude-sonnet-4-6 --name coding-agentOr for an automation agent using Gemini Flash:
openclaw agent create --model gemini-3.5-flash --name automation-agentStep 4: You can run multiple agents with different models in parallel, each handling a specific type of task. OpenClaw will route each request to the correct provider based on the model specified in each agent’s config.
Common API Key Errors in OpenClaw and How to Fix Them?
Most API key issues in OpenClaw have simple root causes and quick fixes. Here are the most common errors you’ll encounter, along with specific troubleshooting steps.
Invalid API key or Authentication failed
This usually happens when the key was copied incompletely, or when there are accidental leading/trailing spaces. Paste your key into a text editor first to inspect it before putting it in .env. Also check that the key belongs to the right provider – mixing up an Anthropic key with an OpenAI slot is a surprisingly common mistake when setting up multiple providers at once.
Insufficient credits or Quota exceeded
Your provider account has run out of credit, or you’ve hit the free tier limit. If it’s a billing issue, topping up your credits will resolve it. For free tier limits, either wait for the quota to reset or upgrade to a paid plan. More importantly: set a spending limit on every provider from the start.
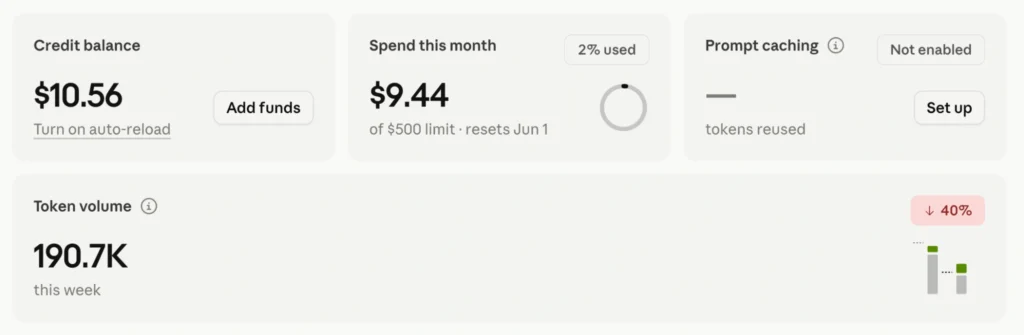
When an OpenClaw agent hits an error loop, it can fire off a very large number of model calls in a very short time.
Model showing unavailable in openclaw models status
This is usually caused by environment variables that weren’t loaded correctly. For example, you may have added the key to .env but OpenClaw’s gateway is still running from an older session that hasn’t picked up the file yet.
Try manually exporting the variable and restarting the gateway to see if that resolves it. If not, double-check that you’re using the correct variable name for that provider – Gemini, for instance, requires GEMINI_API_KEY or GOOGLE_API_KEY, not any other variation.
Gateway won’t start after editing openclaw.json
OpenClaw validates config files very strictly. A wrong field name, wrong data type, or an unrecognized field can all prevent the gateway from starting – often without a clear error message. The safest approach is to compare your changes against the sample config in the official docs before editing, and change one field at a time rather than pasting in entire blocks.
A specific skill fails even though the model is working fine
This isn’t a model key issue. Some skills require their own third-party service keys. For example, image generation skills may need FAL_KEY or OPENAI_API_KEY depending on the image provider; the search skill requires FIRECRAWL_API_KEY; the GitHub skill requires GITHUB_TOKEN. Check the docs for each skill to find out which additional keys are needed.
The Simpler Alternative: Use OpenClaw Without the Configuration Overhead
Not everyone wants to go through all of the above, and that’s completely reasonable. If you just want to use OpenClaw without touching a terminal or a config file, there’s an option built specifically for that.
If the thought of terminals, .env files, and environment variables isn’t your thing, there’s another option: TryOpenClaw.io.
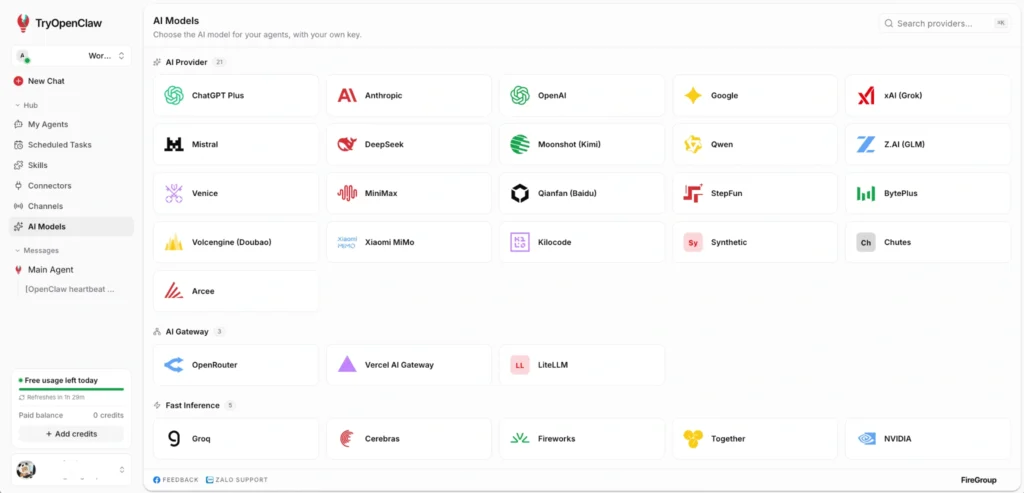
It’s the hosted version of OpenClaw, which means no installation, no API key management, and no server or security headaches to deal with. Just create an account and you can start using AI agents in about 2 minutes.
TryOpenClaw.io comes with several popular AI models built in, so you don’t need to purchase API access right away. You can still connect your own preferred models later if you want to fine-tune performance or optimize costs for specific workflows. And switching between models is just a few clicks whenever you need to.
What makes TryOpenClaw stand out is that it has direct integration with your ChatGPT Plus account. Instead of loading up API credits and paying per usage, you can leverage your existing subscription to run agents – which can be significantly more affordable.
Wrapping Up
Setting up API keys might sound like a dry technical chore, but it’s actually what determines your entire OpenClaw experience going forward – both in terms of performance and cost.
- If you’re just getting started: run
openclaw onboard, pick Gemini Flash, add $10 to Google AI Studio, and start using it. Don’t try to configure multiple models on day one. Figure out what you actually need first, then expand from there. - If you’ve been using OpenClaw for a while and costs are higher than expected: take a look at which models you’re using for which types of tasks.
- And if you’d rather not manage any of this yourself – API keys, terminal commands, config files – then TryOpenClaw.io is the perfect place to start.
FAQ: API Keys in OpenClaw
Can I use multiple providers at the same time?
Yes – and this is actually the recommended approach. Add keys for all your providers to .env, and OpenClaw will recognize them all, letting you assign a specific model to each agent or workflow. There’s no limit on the number of providers.
Will my keys be exposed when using OpenClaw?
Your keys are stored locally on your machine and are only sent to the corresponding provider when a request is made. OpenClaw doesn’t store or forward your keys anywhere else. The main risks come from leaving your .env or openclaw.json files unprotected (missing chmod 600), or accidentally committing them to GitHub. Following the two basic security steps mentioned earlier is enough to cover the vast majority of cases.
Do I need to re-export my keys every time I restart the terminal?
If you’re using manual export commands, yes – environment variables don’t persist across sessions. To avoid that, store your keys in ~/.openclaw/.env and OpenClaw will load them automatically on every startup. Alternatively, add the export lines to ~/.bashrc or ~/.zshrc if you want the keys available in every terminal session.
Related Posts
OpenClaw v2026.10.5 có gì mới?
Bộ prompt viết code bằng trợ lý AI hiệu quả cho lập trình viên