How to Install OpenClaw on macOS with 13 Steps for Beginner?
Installing OpenClaw for the first time can feel a bit like assembling a LEGO set without the instruction booklet. There are a lot of moving parts like Node.js, an AI model, a Gateway, chat channels and it’s easy to feel lost. The good news is that once you understand the order things go together, the whole process becomes a lot more straightforward.
This guide walks you through everything from A to Z: setting up OpenClaw on macOS without having to keep a dozen other documentation tabs open. From the moment you open Terminal to the moment your agent sends its first reply, just follow the steps and you’ll have an AI agent running right on your Mac.
Key Takeaways
There aren’t many ways to install OpenClaw on macOS, but there are plenty of spots where beginners tend to get stuck. Before diving into the details, here’s a bird’s-eye view of what this guide covers:
- Install OpenClaw using the official installer
- Run the QuickStart setup wizard
- Configure the Gateway and local workspace
- Connect your AI API key
- Set up a Telegram Bot to chat with OpenClaw
- Enable web search and configure basic skills
- Open the OpenClaw Control UI
- Verify that the agent is working correctly
- Troubleshoot common setup errors on macOS
If this is your first time working with OpenClaw, don’t worry. The whole process takes about 10–15 minutes if you already have your API key and chat channel Bot token ready to go.
What You Need Before Installing OpenClaw on macOS
Before you start, take a few minutes to make sure your computer meets the basic requirements:
- Running macOS Monterey or a newer version
- Node.js version 22 or higher installed
- A stable internet connection throughout the installation
- Terminal access on macOS
If you haven’t installed Node.js yet, you can do that quickly via Homebrew before continuing.
You’ll also want to have these ready for when setup is complete:
- An API key from an AI model provider such as OpenAI, Anthropic, Google Gemini, or OpenRouter
- A Telegram Bot Token (if you want to chat with OpenClaw through Telegram) or any other chat channel bot token.
Once everything is in place, open Terminal and check your Node.js and npm versions with:
node -v
npm -v
If Terminal returns version numbers for both, you’re good to go.
Step 1: Run the OpenClaw Installation Command
Open Terminal and run the following command:
curl -fsSL https://openclaw.ai/install.sh | bash
The installer will automatically detect that you’re on macOS, check for Node, npm, and Git, then begin installing the OpenClaw package.
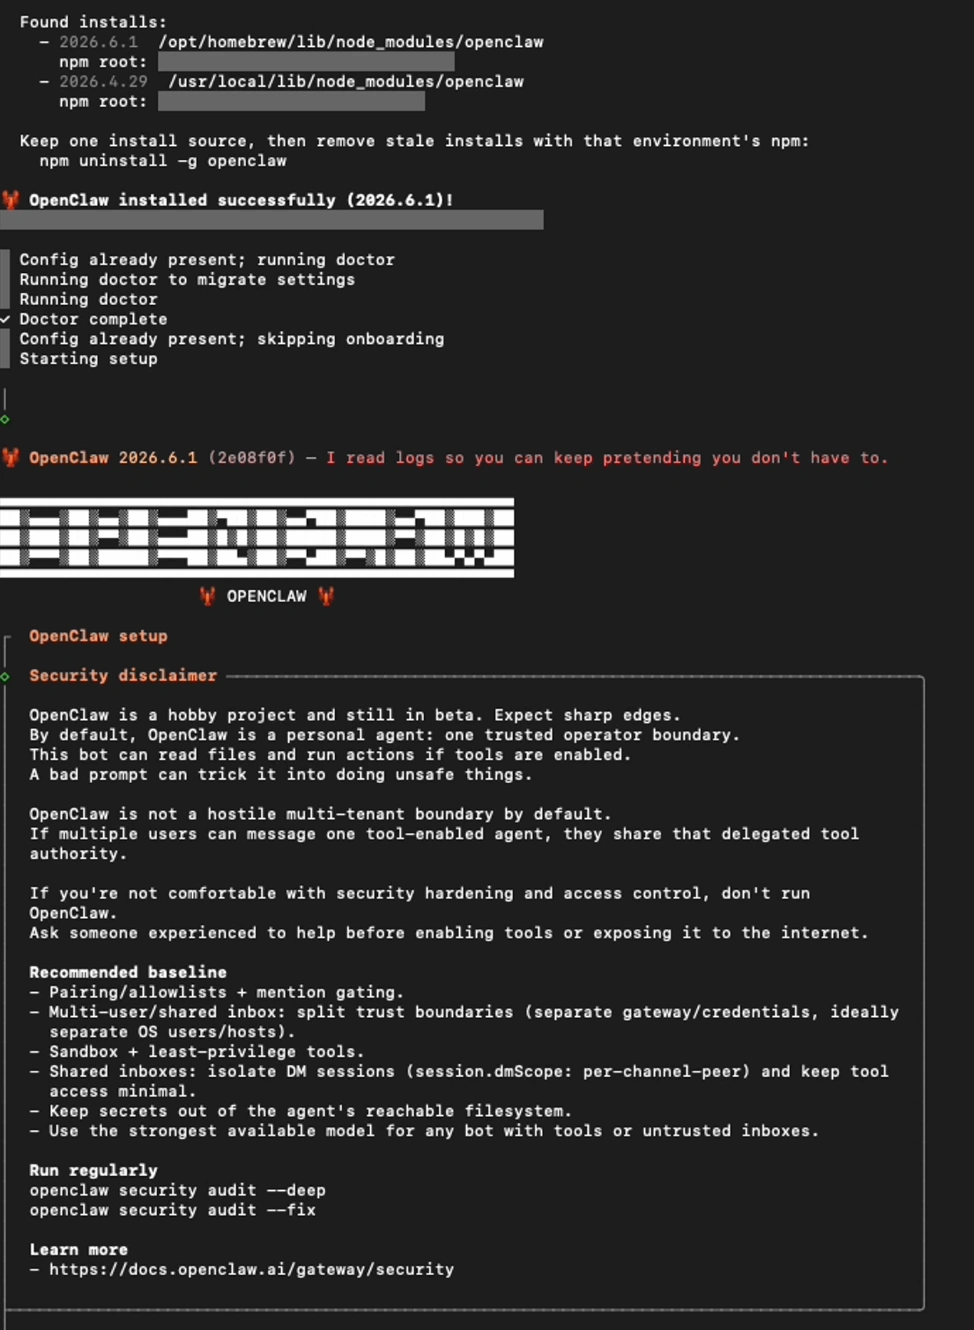
If everything goes smoothly, you’ll see the message: OpenClaw installed successfully.
Step 2: Run the Setup Wizard
Once installation is complete, OpenClaw will automatically launch a setup wizard in Terminal. The very first thing you’ll see is a security notice.
Don’t just hit Enter to breeze past it. OpenClaw is an AI agent that runs directly on your machine; it can read files, use tools, and take actions when given the right permissions.

For personal use, the setup is pretty simple. But if you’re planning to share it with others or expose it to the internet, it’s worth reading this section carefully before moving on.
Step 3: Start Setup
When you get to the screen asking about setup mode, choose QuickStart.

This is the best option if you just want to get OpenClaw up and running on a personal machine quickly. QuickStart automatically configures the key components like workspace, gateway, model, and basic settings so you can get started without needing to fine-tune everything manually.
Step 4: Check or Reset an Existing Config
If OpenClaw has been installed on your machine before, the wizard will detect an existing configuration and let you know. It might list things like:
- Workspace
- Model
- Gateway
- Session
- OpenClaw config file

If you want to start fresh, you can choose to reset before continuing setup.
Step 5: Configure the Gateway
The Gateway handles communication between OpenClaw, your AI models, chat channels, and the Control UI. In most cases, you can leave the default settings as OpenClaw suggests.

If asked about the bind address or network access, go with the option that restricts access to your current device only (localhost or 127.0.0.1). It’s simpler and more secure than opening the Gateway to an external network.
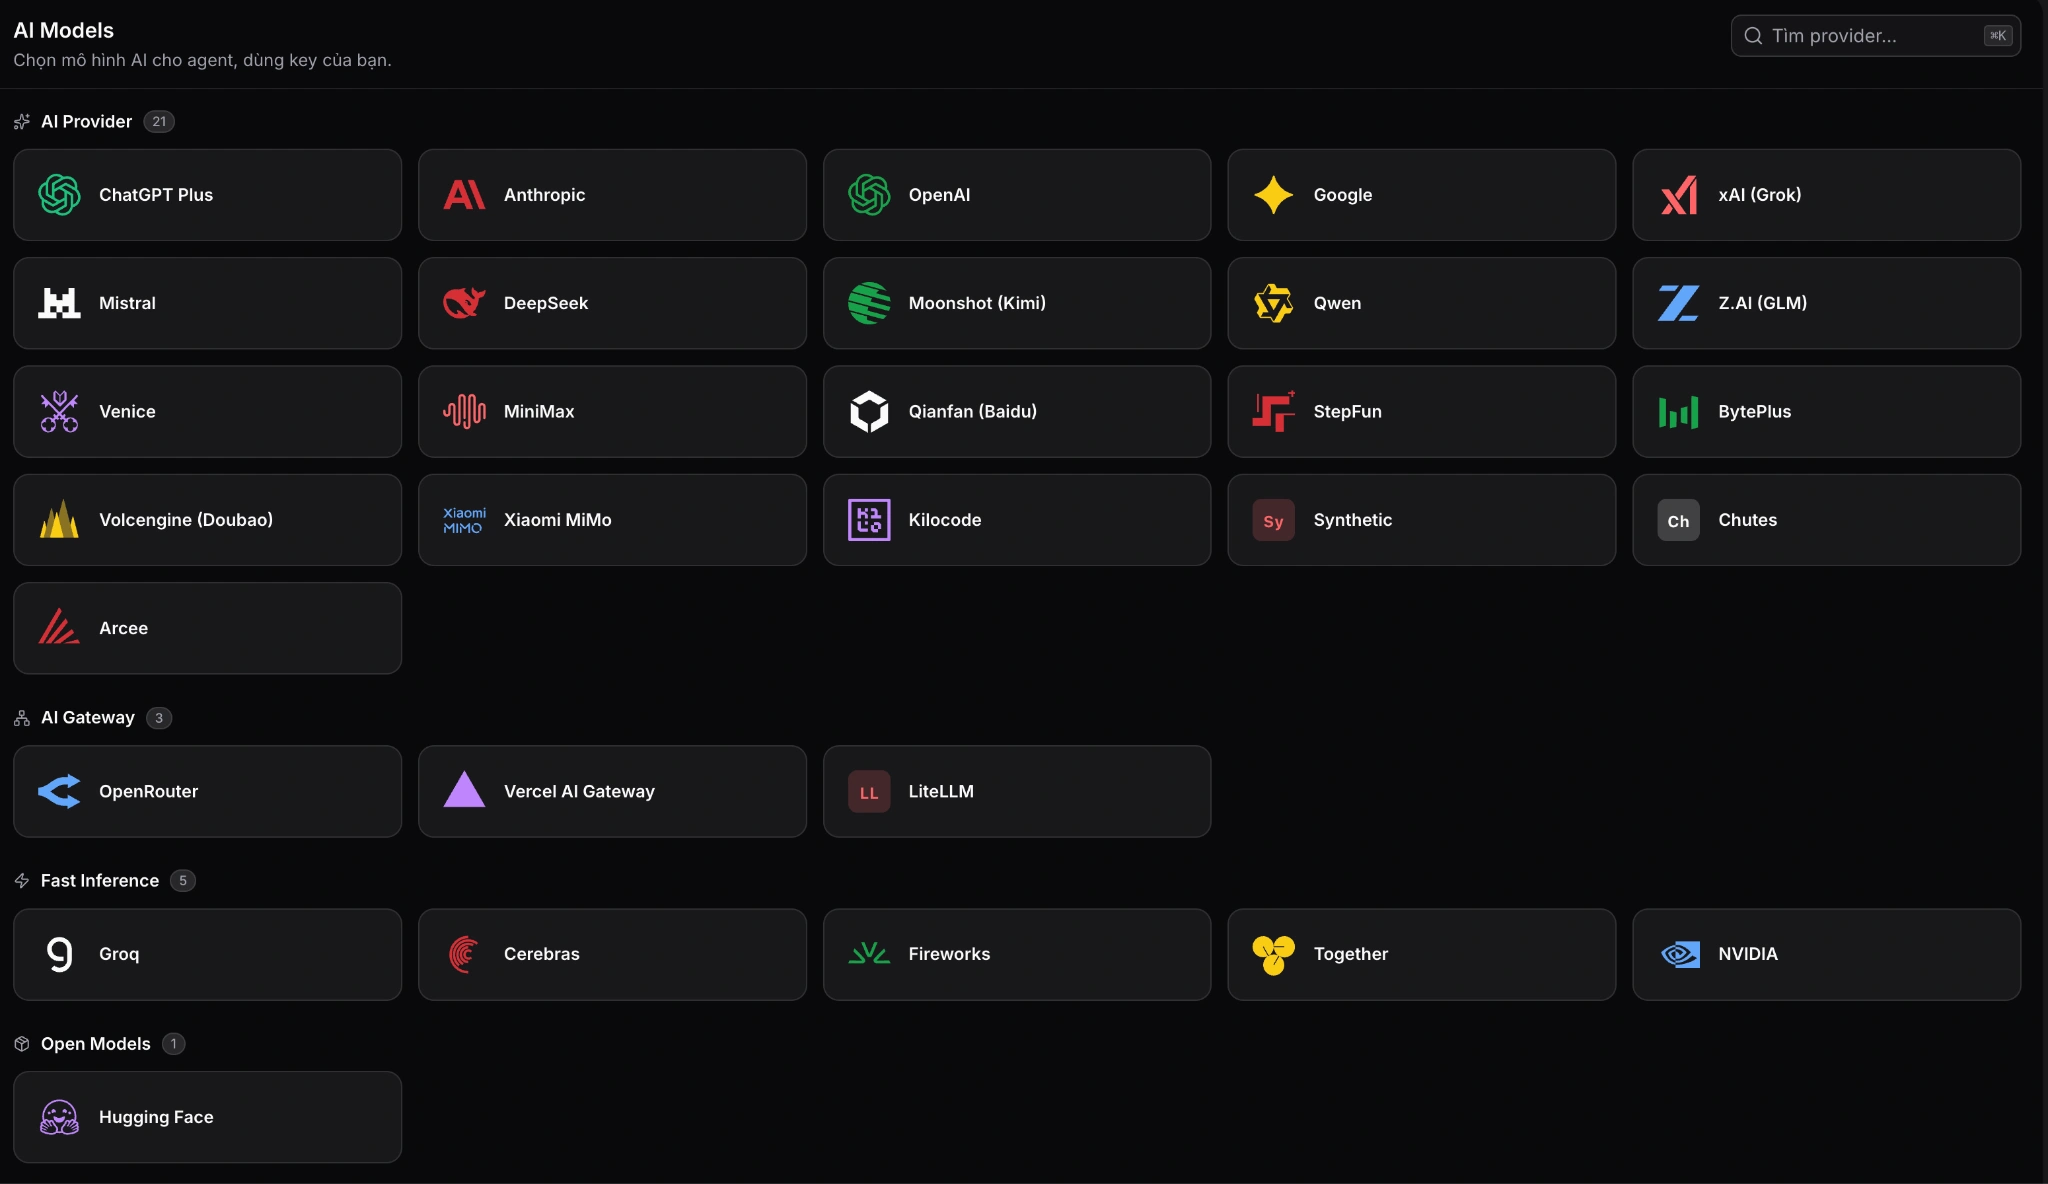
Step 6: Choose a Model and Auth Provider
Next, OpenClaw will ask you to pick an AI model and how you’d like to authenticate with it.
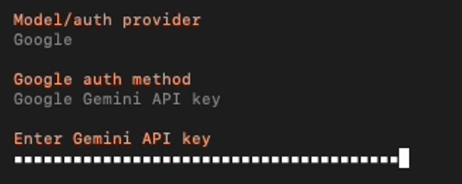
If you’re new to this, popular options include Google Gemini, OpenAI, and Anthropic. Once you have your key, just paste it in. OpenClaw will save the information locally and use it each time it starts up.
Step 7: Choose a Chat Channel
OpenClaw can work across several chat channels like Telegram, Discord, Slack, WhatsApp, or its own built-in web chat interface.
If you just want a quick test run, the Web UI in your browser works perfectly fine. If you’d rather chat through a messaging app to use OpenClaw on the go, pick your platform of choice and follow the wizard’s instructions for connecting it.
For example, if you choose Telegram Bot API, the wizard will ask for your Telegram bot token. Here’s how to get one:
- Open Telegram
- Search for BotFather
- Create a new bot using the
/newbotcommand - Copy the token BotFather sends back
- Paste the token into Terminal
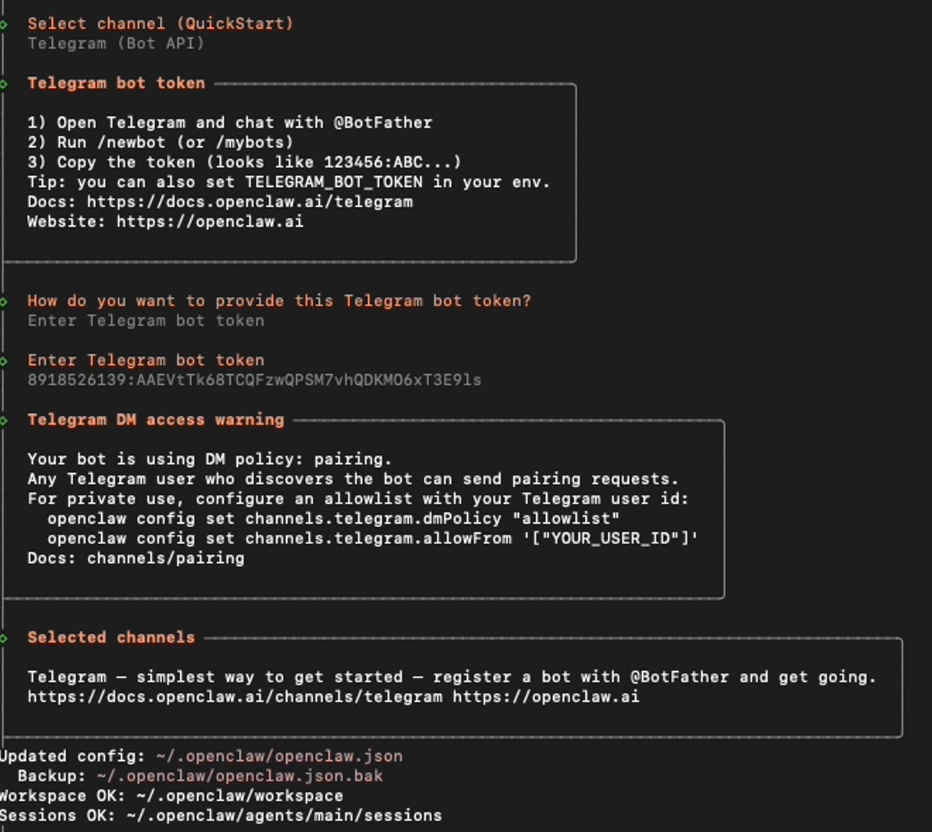
Once you’ve entered the token, OpenClaw will save the Telegram channel to your config.
Step 8: Configure Web Search
Web search is what lets your agent look things up online when needed.
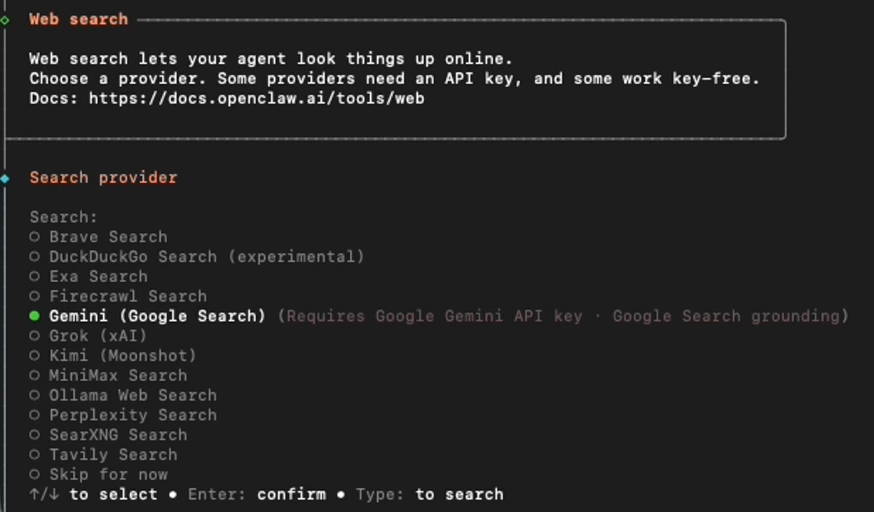
Some search providers can share the same API key as the AI model you already configured. For new users, the default option OpenClaw suggests is more than enough to get started.
Step 9: Configure Skills
Skills are extended capabilities that let OpenClaw handle specific tasks like browser automation, email management, or integrations with third-party services.
OpenClaw will scan your current skills and report their status, which might include:
- Eligible skills
- Missing requirements
- Unsupported on this OS
- Blocked by allowlist
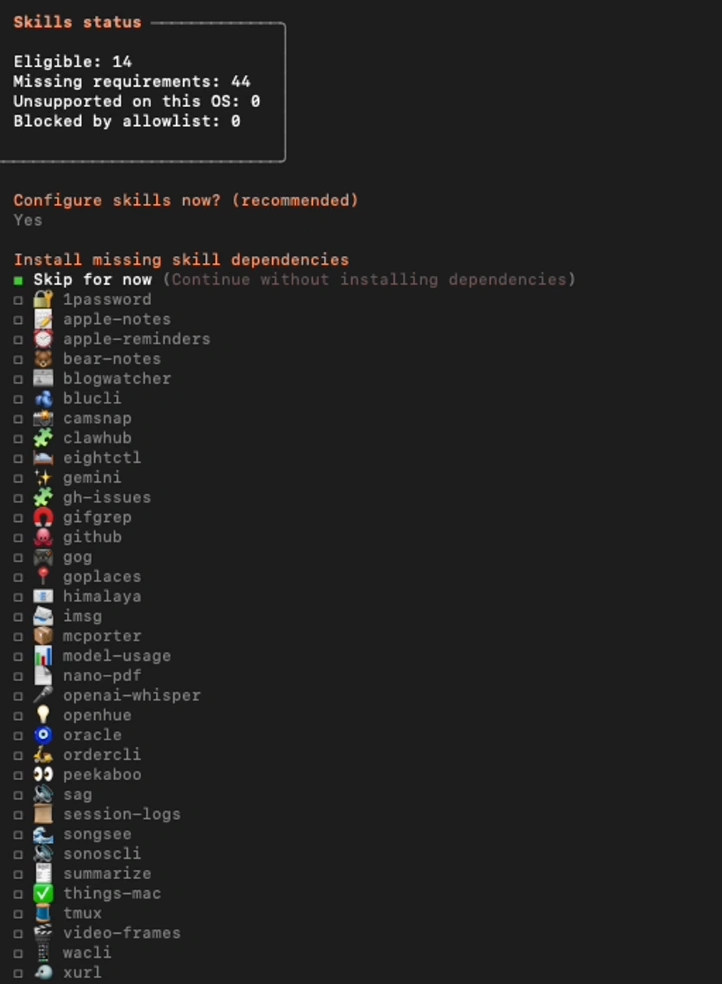
When asked whether you’d like to configure skills, you can say: Yes.
The wizard will then ask if you want to install missing skill dependencies. If this is your first setup and you don’t need advanced skills right away, you can skip for now to avoid installing a bunch of things you’re not ready to use yet.
Some skills require their own API keys like Google Places, OpenAI Whisper, or ElevenLabs. If you don’t need those yet, just select No.
Step 10: Configure Hooks (Optional)
Hooks let OpenClaw automatically run certain actions when specific commands or events are triggered.
If you’re new to OpenClaw, the right call here is: Skip for now.
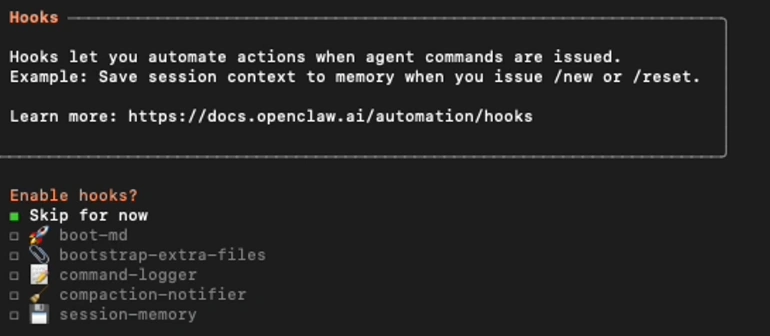
You’ve just finished installing no need to turn on every feature from day one.
Step 11: Install the Gateway Service
At the gateway service runtime step, QuickStart uses Node to run the Gateway service.
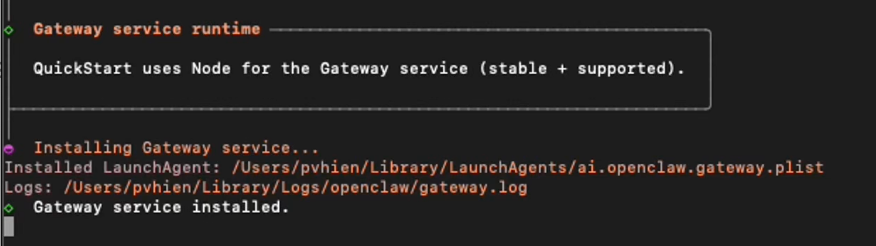
Once this completes, you’ll see Gateway service installed, and OpenClaw will begin running the agent.
Step 12: Choose How to Hatch Your Agent
After the setup wraps up, OpenClaw asks how you’d like to launch the agent. You have 3 options: Hatch in Terminal, Hatch in Browser, or Hatch later.
If you’d like to chat with OpenClaw through a visual interface, go with Hatch in Browser. OpenClaw will open the Control UI in your browser, where you can have conversations, check sessions, switch models, and manage your config.
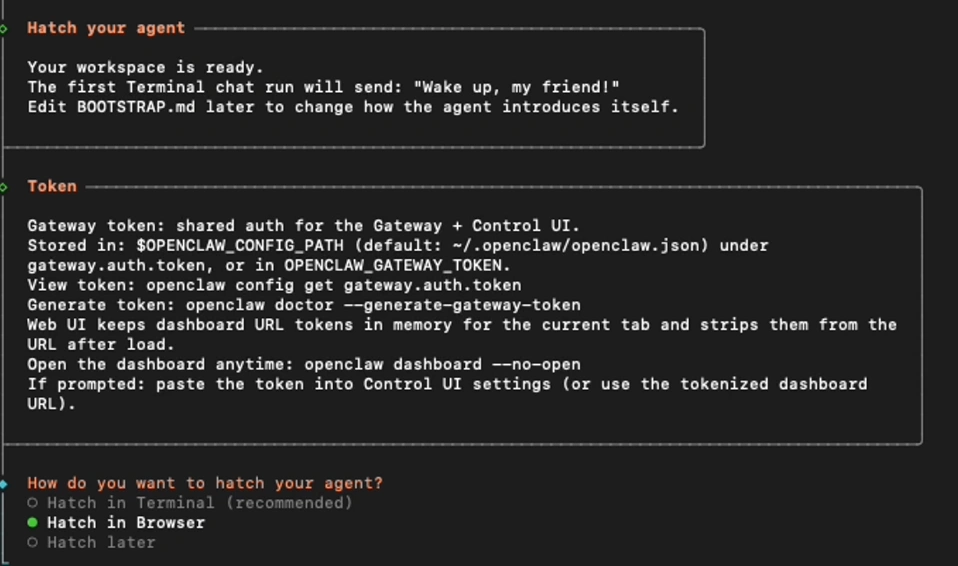
If you prefer working directly in Terminal, choose Hatch in Terminal. And if you want to tweak a few more things before diving in, pick Hatch later.
Step 13: Verify OpenClaw Is Working
Finally, send a simple message to test the system.
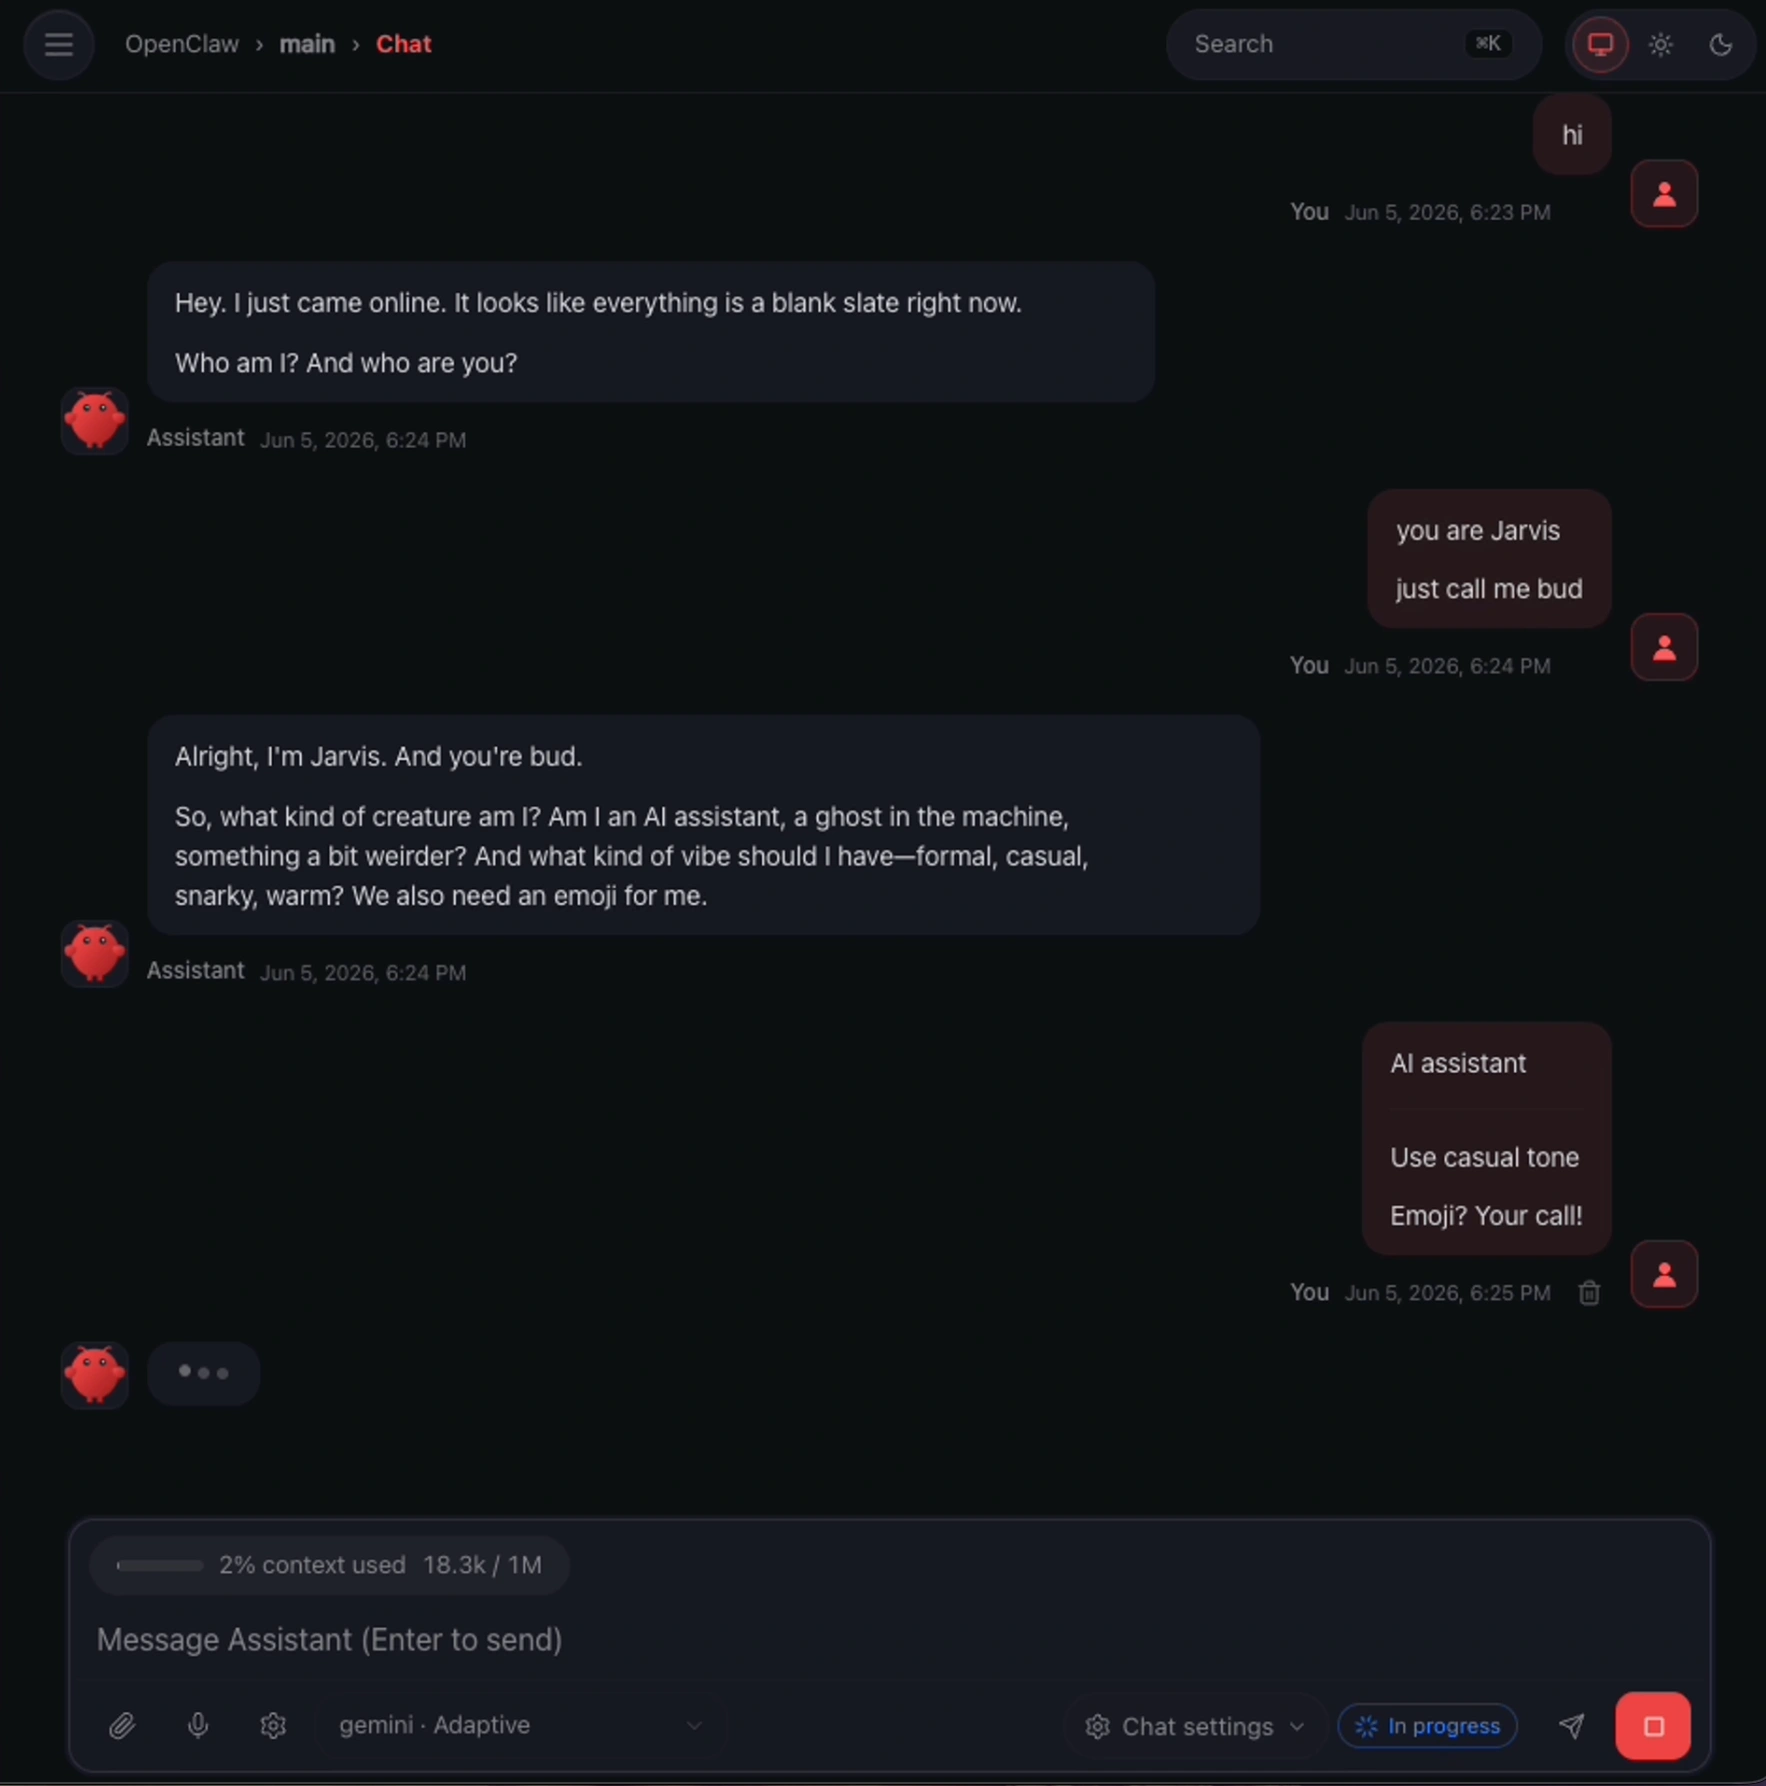
If the assistant responds normally, your installation is complete. From here, you can start exploring skills, connecting more chat channels, or building your first automated AI workflows.
Common Errors When Installing OpenClaw on macOS
1. Wrong Node or npm Version
This is the most common issue for new users. If Terminal doesn’t recognize node or npm, Node.js is probably either missing or too old.
Try running:
node -v
npm -v
If no version number appears, go back and install Node.js first, then try again.
2. Can’t Open the Dashboard
If OpenClaw is installed but the dashboard won’t open in your browser, don’t panic. The most likely cause is that the Gateway didn’t start correctly or stopped partway through.
The quickest fix is to restart the Gateway or re-run the setup wizard.
3. Telegram Bot Isn’t Responding
A bot that’s online but won’t reply is a very common first-time issue. Check the following:
- Did you enter the bot token correctly?
- Did you press Start in the Telegram bot chat?
- Was the Telegram channel enabled during setup?
- Is the OpenClaw Gateway actually running?
Missing any one of these steps is usually enough to cause the bot to go silent.
4. API Key Isn’t Working
If OpenClaw loads fine but the model isn’t responding, the API key is usually the culprit. Common causes include a typo in the key, a depleted quota, or the key not being saved correctly in the config. Double-check your API key and try reconnecting the model before assuming it’s a more complicated problem.
Should You Install OpenClaw Locally on macOS?
Yes if you want full control over your system is what you’re after. Installing OpenClaw locally means you manage everything yourself: the model, API keys, skills, workspace, and all the configuration underneath. This is a great choice for developers, power users, or anyone who wants to dig into how OpenClaw works under the hood.
That said, the trade-off is real: you’ll be handling quite a bit of your own environment setup, API key management, chat channel configuration, version updates, error troubleshooting, and sometimes even infrastructure-level issues.
If your goal is simply to start using OpenClaw as quickly as possible, TryOpenClaw.io is worth considering. It’s a cloud-hosted version of OpenClaw that skips nearly all the complex setup. No Node.js installation, no Gateway configuration, no self-managed server. You can have a workspace running in under 2 minutes, with all the apps you need to build OpenClaw agents already integrated.
TryOpenClaw.io also comes with popular AI models built in, so you don’t have to purchase and configure API keys right from the start. You can still connect your own preferred model or AI account whenever you’re ready. For anyone who wants to experience what OpenClaw can do without spending hours on setup, this is usually the fastest path to get going.
Conclusion
Installing OpenClaw on macOS isn’t hard, but there are quite a few steps to keep track of: checking Node, running the installer, reading the security notice, choosing QuickStart, configuring a model, entering your API key, selecting a Telegram channel, enabling web search, and opening the Control UI.
Do it right, and you’ll have a locally running AI agent on your Mac, ready to chat through the dashboard or connect to channels like Telegram. In short: a fair number of steps upfront, but once setup is done, it’s pretty great.
Frequently Asked Questions About Installing OpenClaw on macOS
Is installing OpenClaw on macOS Free?
Yes. OpenClaw is open-source software and completely free to install. However, if you use models like GPT, Claude, or Gemini through their APIs, you’ll need to pay the respective model provider for usage.
Which macOS Versions Does OpenClaw Support?
OpenClaw is recommended for macOS Monterey and above. Newer versions like Ventura, Sonoma, and Tahoe tend to offer a more stable experience.
Do I Need to Know How to Code to Install OpenClaw?
Not necessarily. Just following the steps in this guide is enough to get through the installation. That said, being comfortable with Terminal and basic error handling will make the process smoother.
Which Model Should I Use With OpenClaw?
If you’re price sensitive, Gemini Flash or GPT-4o Mini are popular choices. If you need stronger writing or reasoning quality, Claude Sonnet or GPT-5.5 are better fits. OpenClaw lets you switch models at any time, so don’t stress too much about the initial pick.
Can I Use OpenClaw Without Installing It Myself?
Yes. If you’d rather skip Node.js installation, API key configuration, and technical troubleshooting, TryOpenClaw.io is an alternative worth looking at. It’s a cloud-hosted version of OpenClaw that gets you up and running in just a few minutes with no local infrastructure required.
Related Posts
OpenClaw Skills Security: How to Evaluate, Install Safely, and Harden Your Setup
Best OpenClaw Skills: 25 Must-Have Skills by Category (2026)